Wednesday, August 31, 2011

Felt laptop

When I first saw this super-cute idea on Pinterest, I just knew the Little Joyfuls would love it! You can find the tutorial here to make one of your own. I adapted mine a little in terms of colours (using what I had on hand) and by slipping in a thin piece of cardboard between the layers of felt to make it slightly more sturdy. The letters are rub-ons I found in the craft section at our Crazy Store.


The children saw me making this and Sweetpea is very excited about it, but it's actually part of a stash of little treats I am working on for when baby comes. I've cleared a small shelf in my closet where I am collecting handmade toys and homemade activity packs I can pull out as needed in case things get a little busy during those first few weeks.  More about this in a future post!

Tuesday, August 30, 2011

Mama-made Toys: Stick puppet theater

Oooohhh, I am just giddy giddy glad to FINALLY have gotten around to making a puppet theater for the children!! It took some serious thinking, because I wanted something they could play with themselves, too, and since they're still a little young, they would rather be seeing the action played out, than be stuck behind the curtain putting on a show they can't watch. The solution was a table-top theater for stick puppets.


I started with two sturdy boxes, and cut a slit in the side of one. This would become the floor of our stage, through which the puppets are slipped.

For the background, I used fabric glue to glue down two pieces of felt. I chose felt so that we can later add other felt elements or 'props' to our background depending on the play we are putting on! The bottom of our stage got the same treatment, making the slit I cut in earlier, nice and smooth for the puppets to glide back and forth. I then covered the sides and back of the box in some fun polka dot gift wrap.
Next, I attached the first box (i.e. the stage) to the second box, which would serve as its stabilizing base. This also allows us some space to fit our hands in under the stage to manoeuvre the puppets.
The curtain 'rail' is just a length of ribbon strung across the top of the stage and secured on the outside with two wooden beads. 
I painted the base blue, and sewed some ribbon ties to the curtains to keep them in place while the show is on.

Our first set of puppets were hand drawn and coloured by yours truly, and then popped through the laminator and glued onto popsicle sticks. The characters are from the 1970's Japanese Anime version of Heidi - this was one of the first children's shows on South African television and the first TV program I can recall watching. So last year my mother gifted my daughter with a set of DVD's of the first 25 episodes, and Heidi is now about as much part of our family as any of the actual flesh and blood members!!

Here are the characters:


And here they are on stage, with some felt props in the background!!


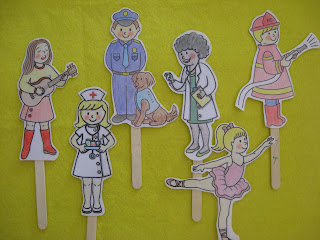
I also found these printable Community Helpers  which we printed, coloured and laminated. Will keep you posted as our repertoire of shows grows!!


Monday, August 29, 2011

Best Friends


"Sometimes being a brother is better than being a superhero."


A few weeks ago my parents had to chop down a Brazilian Pepper Tree in their back garden, because the roots had begun to destroy the paving. We went over to check on their progress, and I took this picture of my sweet little ones as they were mourning the loss of a really great swinging tree... I love to watch the special bond between them - they really are best friends.

Thursday, August 25, 2011

Printable Cars play set

I found this very cute printable Cars play set via Pinterest  on Parents24.com and the Little Joyfuls have been having a blast with it!! 


Thursday, August 11, 2011

Play and Learn with Mama: Disney's Cars Theme - Reward chart


   My three-and-a-half year old daughter is a very...umm...let's call it enthusiatic eater... Which is my euphemistic attempt at saying that the girl just really struggles with table manners!! She loves her food and has a wonderful appetite, but oh, to get her to eat with her mouth closed... to not talk with a mouth full of food... to keep those little elbows off the table!! It's giving this fairly blonde Mama some proverbial grey hairs!!

   So as part of our Cars themed week I made her this reward chart. A magazine picture of Lightning McQueen was laminated and glued onto a wooden clothes peg, and for every meal that she consumed in a civilized fashion, she could move him up one mark closer to the 'Piston Cup.'  The reward was going to the supermarket with her dad to pick out a  Cars puzzle. It worked very well, and we are now into our second week of using it - this time the reward will be a Daddy-and-Daughter outing, probably to her favourite park. Making it fun to get things done!!

Wednesday, August 10, 2011

Play and Learn with Mama: Disney's Cars Theme: Kitchen fun!

 Another little bit of Cars inspired fun - making bread roll cars for lunch! I made an example and set out plates for the children with everything they needed to assemble their own bread roll cars.


   We used:
* Carrot slices for wheels
* Red cocktail onions for headlights
* A small piece of ham for the windscreen (attached with a tiny bit of mayonnaise)
* A Rye roll for the body


Play Food!!!

Monday, August 8, 2011

Play and Learn with Mama: Disney's Cars theme - Learning activities

   A large part of our Cars inspired playing and learning from last week was inspired by the lovely tot book and preschool pack I downloaded from www.1plus1plus1equals1.com (You can read more about our other Cars inspired activities here, and watch this space for more posts later this week)

  I laminated most of the pages for durability so that we can use them again for the younger siblings in years to come, and I keep them with all our other lap books in a file.


For this counting activity we used our Unifix cubes to practice one-to-one correspondence. I didn't want to interrupt the learning that was taking place, so no picture of that, sorry.


I turned the Cars Shapes three-part cards from the Tot Book into a file folder game which both children enjoyed playing: Arrow just matched shapes and colours, while Sweetpea also matched the names of the shapes by identifying the first letters.

We used the Cars Colours cards for a quick scavenger hunt (I was making dinner and this was a lovely little activity to keep the little ones occupied while I was busy!)


I also added some home-made activities using junk mail, a few cheap sticker sheets, and one Disney magazine I bought at the supermarket last week. 

This page from a junk mail add is glued on the back of our lap book. I asked Sweetpea to colour in all the 9's she saw on the page.


Sensory matching cars. They had great fun with these and we played with them a few times during the week. I blind-folded the children, handed them a card, and they had to find its match from the ones spread out in front of them. The textures are (clockwise from top left): tulle, tin foil, sandpaper, corrugated board and polar fleece.

This was from the magazine - I laminated the page and Sweetpea had to circle the differences with her dry erase marker.

Practicing to draw straight lines - stickers, hand-drawn 'roads', laminated.

A mini book to go in the lap book. Sweetpea glued down pictures cut  from junk mail and I 'interviewed' her with questions like: "If you could have a car of your own, what colour would it be?" (Red, of course!!), "Where would go in your car?" and  "Who would you take with you?"

Sweetpea knows the days of the week, but we are working on sequencing and the order of events at the moment, and this Days of the Week Highway was a great tool for talking about what comes before and after, what happened two days ago, etc. This is not a great picture, sorry! Each of the cones has the name of the day of the week written on it, and every morning after breakfast the children moved the picture of Lightning McQueen (cut from the magazine and laminated) one day forward. We are now using it for a second week, since ArrowBoy is really enjoying this and sings a days-of-the-week song every time we do it!


Sunday, August 7, 2011

Play and Learn with Mama: Disney's Cars theme

   Right-o, so by now it should be a well-known fact that we are seriously loving Lightning McQueen of Disney's Cars fame around here. So when I recently saw that Carissa from 1plus1plus1equals1 has a Cars tot book and preschool pack, I knew Sweetpea would just love learning with Mr McQueen! I also added a few activities of my own, and we ended up having a very merry week of playing and learning. I'll be sharing what we got up to in a short series of posts.

Cardboard Cars
   First the little ones had to each have a car of their own, so two boxes from my recyclables stash were converted into box cars. Initially they just sat around in them making car noises, but then Sweetpea became annoyed that they couldn't move, so I cut out the bottoms, and then the race was on!


The one thing that unites all human beings, regardless of age, gender, religion, economic status or ethnic background, is that deep down inside, we ALL believe that we are above-average drivers. - Dave Barry, comedian

   ArrowBoy fetched his old vacuum hose (quite possibly his all-time favourite toy, apart from a real, noisy vacuum cleaner!), stuck one end into an empty garden pot, and used it as the nozzle of his petrol pump! It also doubled as a means of pumping up the tires!!


Life is too short for traffic.
- Dan  Bellack

Giving his car a good scrub!

'Stay tuned' for some more Cars inspired fun in the next few posts!


Thursday, August 4, 2011

Mini books: My Family and Mr McQueen

I have mentioned in a previous post that I recently attended a morning workshop by a delightfully inspiring lady called Renee Lighton, who has some fabulous ideas for facilitating  teachable moments in the home. You can visit her website here, and if you need some inspiration for helping your children with basic numeracy and literacy skills, I can recommend her book, Let's Get Ready. (Available in English, Afrikaans and Xhosa)

One of the many tools she shared with us during the workshop, was mini books made from a single piece of paper. There are thousands of how-to's all over the web for making these little folded booklets, this one being one of them and a lovely one at that!

I couldn't wait to get home and make a few of these for my children. And we haven't stopped making them yet!

Our first set was all about each member of the family.

 I had folded and 'illustrated' these for Sweetpea beforehand and she had so much fun completing them. She practiced writing each person's name on the dotted lines,


coloured their eyes and hair the appropriate colour,


asked us all what our favourite colour is,


and - her favourite page - had us all print our fingerprints.

She's carried these around with her for weeks now, and shows them to everyone who walks through our front door!

Sweetpea is simply smitten with Lightning McQueen at the moment. My children also get a kick out of reading the junk mail and supermarket ads that come with the community newspaper every Wednesday. So, while paging through a pamphlet from the HyperMarket last week, she was beside herself with joy when all the TV's they were advertising had pictures of Mr McQueen on the screens. She promptly asked for a booklet to be folded and the pictures to be cut out, and she happily proceeded to glue them into her book. It is dog-eared and dirty from being loved so much!!


We've also made a mini book to be decorated with a sheet of stickers her grandmother gave her, and when I gave her a new set of mini stamps recently, those had to be tried out in a little booklet of their own!

This is such a lovely way to engage a child in a current interest, and can be used in a myriad of ways! Watch this space for more on how we use mini books here at Joyful Mama's Place!

LinkWithin

Related Posts with Thumbnails