What a very special day we had as we celebrated the Birthday of the Church today!!
All week long we have been reading the story about Pentecost during family devotions. I had made a felt banner which we put up the day after Ascension Day, and we have been counting down the ten days that the disciples waited in Jerusalem after Jesus had gone to heaven. This morning we opened the last flap, to reveal a picture of people from different nationalities receiving the gift of the Holy Spirit on Pentecost Sunday!
And what would a birthday be without a party??
We made Tongues of Fire party hats...
and decorated yummy flame-yellow cupcakes with pretty, bright candles...
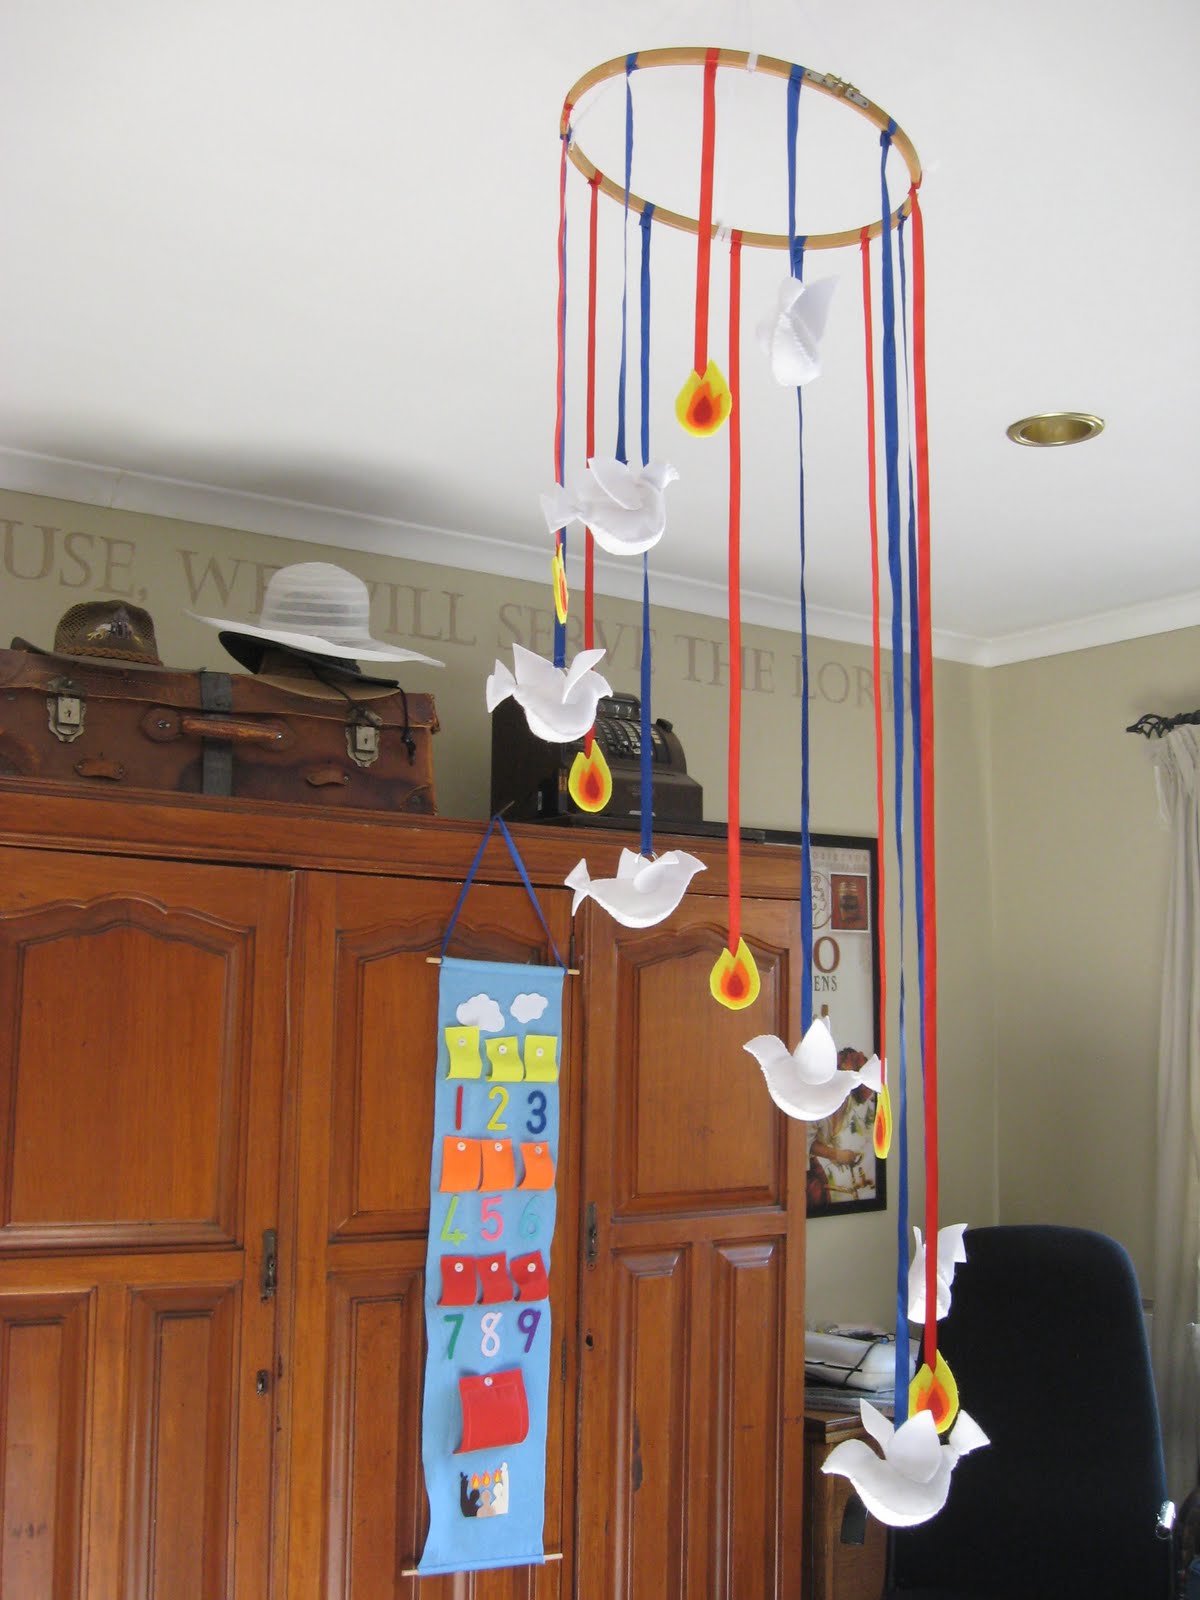
And in the living room we hung a circle of descending doves and flames to remind us of God's Holy Spirit being poured out. (You can find a tutorial for making the three-dimensional felt doves here. I made the flames out of felt too, attached it to ribbons of increasing length, and hung it all from an extra large, old embroidery hoop.).
Our guests were some lovely young people from our church who is in the middle of a Year of Spiritual Equipping through our church's Kingdom Pioneers program. This year we are blessed to have four students who are all from different nations: Malawi, Eritrea, Switzerland and South Africa.(Add to that my Australian husband...and we then had 5 different nations represented in our living room this morning!!) So they came over after church to celebrate with us...and we had such a good time that I completely forgot to take pictures!! We worshiped God together, then my husband read us the story of Pentecost from the Bible, and then each of us had a turn to say the Lord's Prayer in our own language - super special! May you and yours be blessed this week...
Sunday, June 12, 2011
Thursday, June 9, 2011
Using what we have 2: MAGAZINE PICTURES - Flower Girl greeting cards
I've been collecting scraps from magazine pictures with interesting designs on them and keeping them in a plastic sleeve. So when I saw this cute idea on Giddy Giddy, I pulled out the scraps and a glue stick and Sweetpea and I spent a rainy afternoon crafting these pretties!
I used a sharp craft knife to cut out the areas where the girls' clothes would be, and Sweetpea had SO much fun choosing the 'outfits'. She opted for flowers every time, so we have a sweet little collection of Flower Girls just waiting to bring cheer to the happy recipients of these cards.
(We have a little friend whose birthday is coming up soon, and Sweetpea wanted to draw in the face on her friend's card herself - isn't it so sweet??)
Wednesday, June 8, 2011
Using what we have 1: MAGAZINE PICTURES - flowers flip-book
My mother recently cleared out her magazine stash and gave me a whole box full of gardening magazines. I definitely do NOT have green fingers, but I LOVE pretty flowers, and so do my children! We like to identify trees and flowers during our walks in the neighbourhood, and Grandma's garden is the perfect place to discover new plants and enjoy the ones we already now.
I thought it would be fun to have a flip-book with pictures of flowers we may encounter on our walks, or even on trips to the botanical gardens. So many possibilities for a morning walk treasure hunt, too!! So I tore into that stack of garden magazines with my scissors and heated up the old laminator, and...TA-DAA!
I love the cheery, bright pictures of indigenous plants like these arum lilies! The flip book also has beautiful pictures of a variety of proteas, from Kings to pincushions.
One could also use these to make three part cards for Montessori activities.
I love that I did not need to spend any money on this project: the magazines came free with compliments of my mum, the green cardboard was left over from a craft we did a few months ago, and my hubby had gifted me with a pack of laminating pouches at the beginning of the year. I still have a bag full of key rings in the garage that was left over from the key rings I made as favours for our wedding guests almost five years ago (!!), so even that was on hand.
Wednesday, June 1, 2011
Godly Play: Ascension Day 2011
I first saw this idea on Oriental Trading Company where they sell it as a craft for children to make. I've prepared this as a Godly Play prop for telling the story of Jesus' ascension.
This is so quick and basic to make:
Print and cut out one of the many free colouring pictures of Jesus ascending to heaven. (I reduced the size of mine to fit the opening of the paper cup, and glued it onto a piece of card to make it a little sturdier)
Glue some cotton wool to a blue paper cup (you can also cut out white clouds from craft foam).
Make a little hole just above Jesus' head and thread a piece of embroidery floss through it, then through a small slit in the bottom of the paper cup, and sandwich it between two white cardboard clouds.
Write an appropriate Scripture on the cloud - I used Matthew 28:20:
I will set this up as follows: Make a 'mountain' by turning a mixing bowl / shoe box / laundry basket upside down and covering it with a green cloth / sheet /towel. Place peg doll disciples in a semi-circle on the mountain. Position Jesus among them and as you tell the story of how Jesus was taken up in the cloud, pull the cloud so Jesus disappears into the paper cup 'sky'.
(This is not a great photo, but it was a little tricky holding onto the cup and trying to take a photo!!)
We will end this with singing two songs my children know about Jesus returning for us one day (For my local readers: Hy kom weer op die wolke - Oom Karolus en Lente; As Jesus kom op die wolke - Jan de Wet en die Loflaaities.) I also have the full-size colouring page ready which I used for our Jesus figure. You can get it here.
Thursday, May 26, 2011
Play and Learn with Mama - Handa's Surprise Part 2
The highlight of our week of activities inspired by the beautiful book Handa's Surprise, had to have been the day we made a Handa Fruit Salad!

![]() |
We used the book itself as our recipe book and added the ingredients according to the order in the story. |
![]() |
All the fruit mentioned in the book. Guavas were the only fruit that weren't in season, so we used the tinned variety. |
![]() |
We practiced peeling... |
![]() |
...slicing... |
![]() |
...scooping... |
![]() |
...some more slicing... |
![]() |
...another kind of scooping... |
![]() |
...and more peeling. (Please notice the empty chair in the background - our littlest helper went MIA halfway through the salad making!) |

And the best part was enjoying the fruit of our labour in the garden! (The kikoi they sat on is another treasure I bought during a trip to Kenya a few years ago)
The next day we used the left over fruit to make delicious smoothies for a snack time treat.
There was also...
transferring scented wooden fruit using an ice tongs...
transferring smaller fruit and veggies with another kind of tongs...
and we made beautiful 'stained glass' fruit from tissue and contact paper!
And finally...we visited the Mooiberge Strawberry Farm just outside Stellenbosch and although we were not able to pick our own berries, the children loved the bright and cheery junk sculptures and scarecrows in the play area!!
Play and Learn with Mama: Handa's Surprise Part 1
We had a whole week of fun with this lovely book near the end of summer, when most of the fruit in the story were in season and still plentiful. For the first time since my children's birth, though, we are really struggling with winter colds and flu, and the past month or so has been crazy, so I apologise for only getting around to posting about this now.
Handa's Surprise (we did the Afrikaans version, Handa se Verassing) is a beautifully illustrated book set in Kenya, that tells the story of a little girl named Handa, who decides to surpise her friend Akeyo with a basket full of delicious fruit. On the way to Akeyo's villiage various mischievous animals help themselves to the fruit in the basket on Handa's head, and by the time she delivers the gift to her friend, Handa is just as surprised as Akeyo to see what is inside the basket!
Here are some fun Handa-inspired activities we enjoyed:
Making funny fruit faces courtesy of printables from Making Friends.
Practicing pre-writing skills with an apple push pin card from abc-teach. We used a piece of foam under the card and the stylus I bought from Nucleus Toys.
And one morning we had a ton of fun with apple-printing:
We printed and painted a branch from an apple tree (the sun's rays were printed using apple slices)
Apple faces stick puppets. (While the children were enjoying lunch that afternoon, I put on an impromptu puppet show using these guys and the children laughed so much they had a hard time finishing their sandwiches)
We printed and coloured paper dolls from Making Friends and dressed them in cloth dresses. I then set up a little play scape for Sweetpea to use in retelling the story. The huts were toilet paper rolls cut in half, and we glued some packaging straw onto paper roofs.
Acting out the story with the paper dolls was such a hit, that we took it one step further and 'became' the characters ourselves! I bought the fabric that is wrapped around Sweetpea during a missions trip to Kenya in 2005 (the same trip on which I met my husband!). The animal masks were printed from Sparkle Box (see * below) and they are still a favourite plaything around here! (You can also download a full-colour version, but I had fun colouring ours myself). It was the first time I'd introduced masks into our play and the children were fascinated by it. Days later we were still acting out little conversations between the animals.
* Sparkle Box has an amazing collection of free Handa's Surprise resources to download and print, including a story pack, individual story cards, page banners and play dough mats to name just a few. Click on the link to visit their Handa page.
Wednesday, May 25, 2011
Umbrella Rules
I am in the middle of an eight week parenting course called Evergreen Parenting and loving every moment of it -and especially the fruits I see in our household since we started implementing many of the principles!
The course deals a lot with parenting your child according to their unique temperament and has been an amazing eye-opener for me. But most of us in this specific group have toddlers and we all appreciated it when, during the first session, we were given a very practical tool for dealing with discipline issues: we were encouraged to sit down with our children and create a set of Umbrella Rules for our household. At first I thought Sweetpea would be far too young to meaningfully participate, but this sweet three-and-a-half-year old knocked my socks off with her insight and contribution!
We had a lovely family meeting at the kitchen table where the Dad and I showed the little ones an umbrella and chatted to them about its use - to protect us from the elements! We then talked about how rules can also protect us, and together we came up with five basic rules that are appropriate - and necessary - for our family at this point in time. The rules are really super-simple and basically focuses on obedience and courtesy. They are:
1. There is a time for everything.
2. We talk nicely to each other.
3. We take care of our things.
4. We have good manners.
5. We help each other.
(A family with older children can use a more symbolic picture and the rules will obviously look very different from ours.)
We wrote the rules down on the five sections of an umbrella I had drawn beforehand, and added a simple picture as visual clues for the not-yet-reading members of the family. Our Umbrella Rules hang low on a prominent wall in our living room and it is a fantastic tool for guiding the tots in the way of correct behaviour! Sweetpea knows the rules by heart thanks to the little picture clues and responds beautifully when she is reminded of a certain rule.
(You can also order a ready-made Umbrella Rules via the Evergreen Parenting website - click here.)
Subscribe to:
Posts (Atom)